That project I kept saying wasn't done, still isn't done. But I've moved on(both for project and to a better house where I can get more sewing done), it's become something I'll work on here and there.
I made this graphic to print out and tape on the gift so that she could see what the set looked like.
My mother-in-law called me and said that her niece was having a baby shower and wondered if I would make a crib set for her. She's having a boy and really likes Spider-man. I love Spider-man and making crib sets so of course I said I would.
We went shopping for material and found some really cool fabric:
This is a panel to make a Spider-man soft book. We thought we could use it for the bumper. I decided to use it for the inside of the bumper because I had an idea to make Spider-man's costume for the outside. I ended up using 2 panels.
When I first saw this fabric I thought, ew yellow that looks funky and why would they pick that color for a Spider-man fabric. But after we found the soft book panel we knew they would go great together and I realized that it is a pretty cool looking fabric. I used this for the fitted sheet.
That was it for the licensed stuff. My mother-in-law got some other fabric to make blankets, but that was her project. We found a good plain blue and a good plain red fabric for the rest of the crib set.
I was going to make a tutorial as I made this but like always there were some mistakes and I'm too lazy right now to figure out correct measurements. So next I will show my process. If you are following this please read the whole thing before you cut your pieces out!
The Process
What I Used:
-2 panels of the soft book fabric
-4 yards of the yellow Spider-man fabric (I made 2 fitted sheets)
-5 yards blue fabric
-5 yards red fabric
-2 packs of black bias tape
-thread to match everything (red, blue, black, white)
-1/4" elastic, one pack
-black felt for spider
-Heat'nBond Lite
-batting
First the bumper. Like I said in my post about the Scooby Doo crib set, there is a controversy about whether or not to use a bumper. I think parents need to educate themselves and decide what they want to do. A lot of problems are caused because of the bumper falling down, this is why I like to weave it through some of the bars of the crib a little. It makes the bumper tight against the bars and stops it from falling. Correctly securing with ties also helps. But it's the parents choice. Look online, talk to your doctor, decide what you think is best for your baby.
The first thing I did was cut out the pages from the soft book panel. The pages have an 1/4" seam allowance but I left an extra 1/4" of fabric around so I could use the whole page. The pages are the perfect height for a normal crib bumper, but I had an idea you'll see later.
Here are some close-ups of the pages:


As you can see there's not really a story, so I left the pages that were together connected. After cutting out the pages I laid them next to each other and figured 4 sets would work for the long side of a crib
I sewed them together using the 1/4" seam allowance I made.
Then I placed it in my daughter's crib to check it.
I like to weave the bumper through at least the middle slat and the corner ones, this means a longer bumper. This looked right at the time but later I ended up having to remove a single page from each end. Since I thought it was correct I went ahead and double stitched my seams.
I always double stitch. It helps especially with fabric that frays and makes the seam stronger.
For the short end of the bumper I used 2 sets of pages.
So far pieces for this made are: two (2 sets of pages sewn together), and two (4 sets of pages sewn together).
So I had my measurements and inside bumper pieces sewn together. The one page from the soft book has a "This Book was Created for____". I didn't want to leave it like that and since I didn't think I had enough pages I decided to cover it.
I cut out the Spider-man front from above the instructions, leaving at least an 1/4" allowance around. I had two pages to cover but I used 2 panels so I had 2 instructions to cut from.
I never appliqued before and always wanted to try it so here was my chance. I pinned it where I wanted placing the pins in the middle so I could fold the outside fabric under.
I folded the top under to where there was just enough white space above the lettering and put it on my sewing machine. I did a regular stitch around.
When I got to the corner I stopped ahead and folded it under. This is actually after I did the top and down one side but you get the idea.
And then I folded the other side down.
After stitching around this is what I got.
Not too bad but I thought it could use an edge, I wanted to make sure it would stay down, and I didn't want it to fray. So I tried one of the stitches on my machine, number 11.
I thought it looked okay. For the other side I used a zigzag stitch and I think I like that one better.
Here are the two side by side so you can compare.
Next I went to cut the pieces for the front side of the bumper. At the time I was thinking about doing a normal bumper, so i measured it to be 11" wide. I cut out enough strips to go with pieces I'd sewn together of the Spiderman pages. I also cut a strip of 11" wide red. I'm telling you this because it'll effect what I had to do with the rest of the project.
After cutting these pieces and deciding how to put the blue and red together to make it look like the chest of Spider-man's costume, I started thinking about how bumpers work. I like to tuck the bottom edge between the mattress and crib bars to help prevent it from sliding up and down. If I did that I would lose height from the bumper and some picture, I didn't think that would look great. I can weave it through bars and tie it but it will still crinkle together and slide. So I thought why don't I add a piece below about the height of the mattress. This would prevent it from collapsing down and it would be held down by the mattress. Then I thought shit I just cut my fabric up. But I liked the idea and decided to try it. I think I cut my blue pieces down to 7" for the bottom of the storybook pages, it's hard to tell from my pictures. I believe the mattress was 6" thick and I added an extra inch for 1/2" seam allowances on top and bottom. Any way this is what it looked like after I sewed the pieces together.
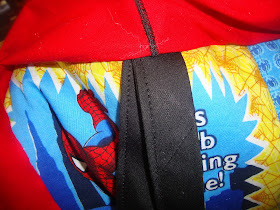
For a better seam I folded the sewn edges pieces down toward the blue fabric and stitched it down.
This is what it looked like after that.
Don't forget that if your fabric stretches a little to make sure you stretch when comparing it to another piece to cut, also the measure twice cut once ruler applies, or you get this,
I sewed on another piece of blue to get it to the right length, then trimmed off the extra. Oops, at least it's close to the seam so it won't really be noticed.
Now that I had the height I wanted for the bumper I could make make the pieces for the out side, I think it was 17" in height. For the out side, that's going to look like the chest of Spider-man's costume, I took one of the 17" stripes I cut and decided how wide I wanted the blue to be. For the side that's going to connect with the red I cut diagonal to give it more dimension, so from my pictures the top mearsed 14" and the bottom measured 16". Then I placed the pieces on a red strip I cut to see how big the red piece would be and for placement. Since this was for the long side of the bumper I placed the story page piece above for reference.
Then I decided even with the diagonal edge it looked too plain. I folded the edge this way and that until I saw something that would work. Example,

I liked the second one so I cut the pieces, putting both the blue pieces together when I did so that they would be the same.

I placed the blue pieces where I wanted them leaving a little extra on the out ends for just in case. Next I cut the red piece.


I used these 3 pieces to make the same pieces for the other side. Before I sewed anything together I wanted to stitch on the black stripes that make the web look on Spider-man's costume. I tried just a regular stitch and did the vertical lines. First I found the middle of the red piece and stitched straight down the middle. Then I did lines every couple of inches, I eyeballed what I thought was the best width between. I also curved them a little towards the bottom to add dimension.
Then I added the horizontal lines making them curve between the vertical lines.
I thought that the lines were way too thin so using the stitches as a guide I used my zigzag stitch on it's smallest setting(for one of the adjustments, I don't know what it's called( see pic below) basically an embroidery stitch, and went over it.


Much better! I did this to both red pieces. I wanted the two long sides to be the same and the two short sides to be the same. I thought about making one long side like the back of Spider-man's costume but then I thought that would be a pain in the butt to put on the crib and then try to line everything up.
Next step is to add the spider logo. I went online and found it, then printed it off to the size I wanted. I ended having to print it off on two sheets of paper.
Next I took the Heat n Bond and cut a piece to the size of the spider, placed it on top (paper backing facing up), and traced the image onto the paper back.

Then I placed the Heat n Bond onto a piece of black felt and ironed it on according to the directions. After that I cut out the spider shape.

That done, I took off the paper back and placed the spider onto the center of the red piece I made. Then I ironed it again according to instructions of the Heat n Bond.
I used the Heat n Bond Lite because I wanted to stitch around the outside of the spider to make sure it stayed on, the Lite is better if you're going to sew because it won't get your needle all gunky from adhesive. I liked using it, it kept the shape in place and I didn't have to worry about pins. I used the same stitch I did for the lines.

After all that was finished for both red pieces I sewed on the blue pieces.
Then I sewed batting to the two story page pieces and two blue pieces I made for the short sides of the bumper. I stitched across the middle to help keep the batting in place. After that you have to sew the pieces for the inside together; short, long, short, long. The same goes for the outside pieces. I decided to check the length of the bumper again to make sure it was right. I weaved the inside piece through the bars. I'm glad I did because it ended up being too long. I cut a page from each long inside piece, I had to take a short end off of the inside bumper piece since I sewed them all together.
This also meant that I had to trim the spider logo pieces.
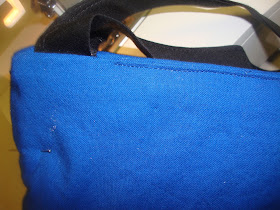
Now I could put all the pieces back together. I had the bumper inside and outside pieces ready now I had to get the ties for the bumper ready. I cut ten 24" length pieces. I folded the raw edges in and sewed them down and then I took each piece and folded it on it's fold and sewed down the length. I pinned the inside and outside bumper pieces together with the ties folded in half and placed between them. I put the ties on the corners of the very ends of the bumper, where the short and long pieces meet, and one on the top middle of each of the spider logo pieces. Then I sewed around the bumper edges leaving one edge open to turn it right side out.


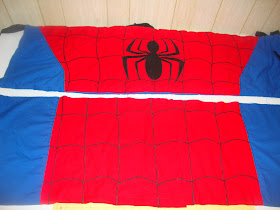
The bumper is done so now it's time for the skirt. I laid the bumper out on the table to use for reference. I cut out blue pieces and red pieces to match up with the bumper, the skirt was made of two pieces for the long side that slightly overlap in the middle.
After sewing the red pieces to the blue pieces I hemmed around the side and bottom edges.

After I did all that I realized for a better look that I should have down the black lines before I hemmed the edges. But it wasn't bad. I just did the lines on the fabric like it was. With the bumper right above I marked on the skirt pieces where the vertical lines were. After I sewed the vertical lines I did the horizontal ones. I did this for both long sides of the skirt.
I didn't take pictures I guess for the short sides of the skirt. I just used blue fabric. Since I messed up my blue fabric that I bought by cutting it wrong for the bumper, I had to make the short sides out of a couple pieces of blue fabric instead of just cutting out one piece. I didn't want to buy more fabric because I didn't think I could fine fabric to match the dye lot of the fabric i had. So after I had the pieces for the skirt made I sewed them to a piece of white fabric cut to the size of the bottom of the crib.
The bumper and skirt done I made the fitted sheets next. I used this great tutorial I posted for crib/toddler sheets on another post, Crib & Toddler Bed Sheets .
Here are some more pictures to show what it looked like.


I made the mobile by taking my old one and crocheting on the frame to make it look like a spider web. I took some Spider-man toys and attached a hoop to the backs so I could tie them on. Then I made a graphic to print out and mod podged that onto the music maker.


No comments:
Post a Comment